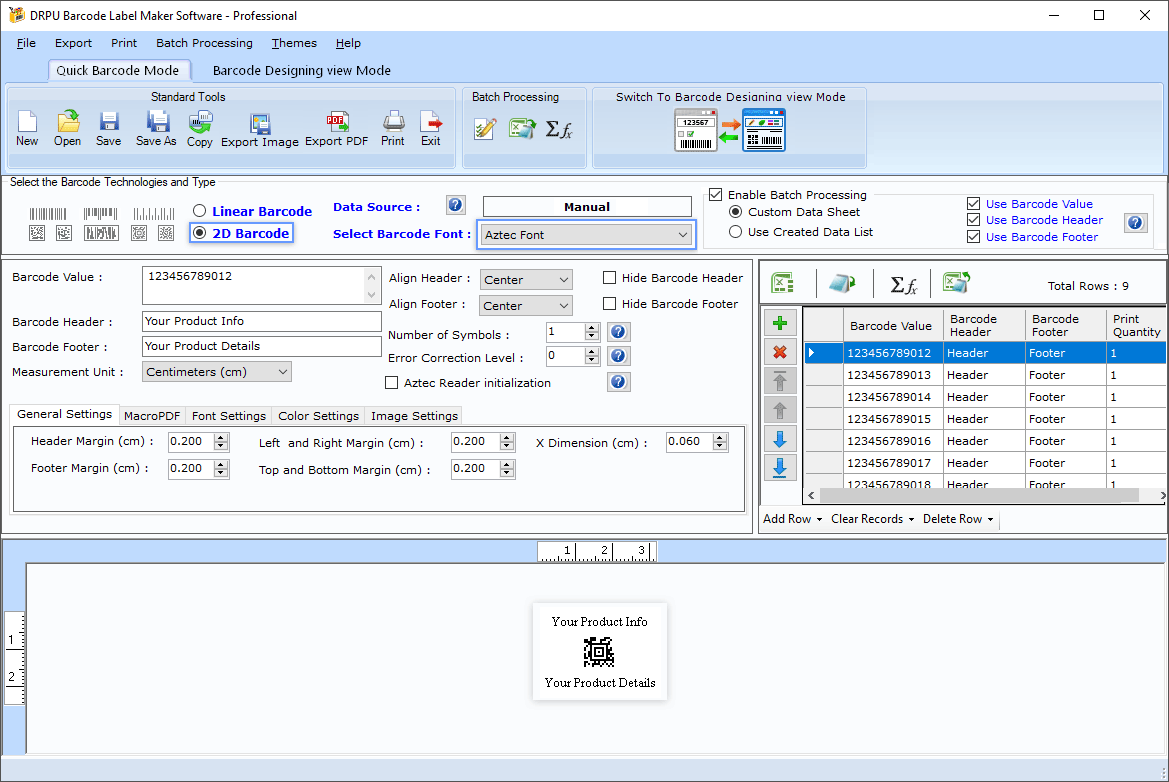
How to generate 2d Barcode ?
Barcode software creates customized 2D barcode labels, stickers and tags for your company products. Barcode program generates 2D barcodes of different shapes and sizes according your business requirement. Barcoding system provide facility to save created barcodes in different file formats like jpeg, tiff, bitmap and other file formats.
Generate Barcode Label using 2D barcode fonts.
How to make 2d barcodes using Professional Barcode Maker ?
On clicking Barcode Settings the following window appears –

Enter following details to generate 2D barcode labels:-
Select the 2D Barcode font option for example Aztec Font
Select Barcode Font: Select the barcode font.
Barcode Value: Enter the Barcode Value.
Message Append: Specify the message appended across multiple symbols if Number of Symbols is greater than 1.
Barcode Header: Enter the Barcode Header details.
Barcode Footer: Enter the Barcode Footer details.
Align Header: Set the Barcode Header to "Left, Center or Right".
Align Footer: Set the Barcode Footer to "Left, Center or Right".
Number of Symbols: Select number of symbols.
Error Correction Level: Select Error correction Level Value.
Aztec Reader initialization: Select if reader initialization symbol requires.
Hide Barcode Header: Select to Hide Barcode Header.
Hide Barcode Footer: Select to Hide Barcode Footer.
How to read 2d barcode using professional Barcode Software?
You can also change the Barcode Settings using following tabs –
Font Settings, Color Settings, Image Settings
General Settings:-

General Settings tab includes following options –
Left and Right Margin (cm): Set the Left and Right Margin.
Top and Bottom Margin (cm): Set the Top and Bottom Margin.
X Dimension (cm): Set the X Dimension Value.
Header Margin (cm): Set the Header Margin.
Footer Margin (cm): Set the Footer Margin.
Font Settings:-

Font Settings tab includes following options –
Barcode Header Font : Select the Barcode Header Font.
Barcode Footer Font: Select the Barcode Footer Font.
How to design QR codes using Barcode Maker ?
Color Settings:-

Color Settings tab includes following options –
Barcode Color: Select the Barcode Bar Color.
Barcode Background Color: Select the Barcode Background Color.
Barcode Header Color: Select the Barcode Header Color.
Barcode Footer Color: Select the Barcode Footer Color.
Image Settings:-

Image Settings tab includes following options –
Select Clipboard Image Type : Bitmap (Bitmap is the type of image format used to store digital images)
Resolution Independent Metafile (Resolution Independent Metafile is a high resolution image file format to save the barcode label)
Image DPI : Enter the Image DPI (Dots Per Inch) value while you copy or save barcode image.
Orientation : Rotate the barcode image in 0, 90, 180, 270 degrees.
Note - Image DPI value changes are only applicable when Image Type “Bitmap” is selected.
Save Barcode : Click "Save Barcode" button to save the generated barcode label.
Copy Barcode : Click "Copy Barcode" button to copy the generated barcode label. You can paste the copied barcode in MS-Word, MS-Excel, MS-Paint etc.
Print : Click "Print" button to print the generated barcode label.